MobSF移动端安全扫描平台
安全扫描平台
目前有很多App安全扫描平台如360漏洞扫描,腾讯金刚审计系统等等。这些安全扫描平台的功能如下:
| 测试要点 | 详细说明 |
|---|---|
| 静态分析 | 静态分析应用源代码中存在的安全风险,检测包含Android组件安全,应用程序安全,数据安全。 |
| 动态检测 | 检测包含客户端自身安全,Android组件增强检测,应用通信安全,数据安全。 |
| 模拟人机交互 | 模拟用户和手机交互行为,检测交互过程中应用存在的通信安全风险。 |
| 服务器指纹探测 | 探测后端服务器指纹,进行安全分析,检测后端服务器系统,开发框架,Web服务器,数据库等服务组件安全。 |
| 服务器后端API检测 | 抓取应用通信过程中的资源地址,检测应用与服务器通信接口是否存在SQL注入,XSS跨站,中间人攻击等安全问题。 |
MobSF简介
MobSF(Mobile-Security-Framework)是一种开源自动化的移动应用程序(Android / iOS / Windows)安全测试框架,能够执行静态,动态和恶意软件分析。
它可用于Android/iOS和Windows移动应用程序的有效和快速安全分析,并支持二进制文件(APK,IPA和APPX)分析。
安装
环境要求
- Python 3.6+
- JDK 1.7+
下载安装
- 安装
MobSF有两种方式,一种是使用docker安装,另外就是使用源码安装。 - 下载地址: Mobile-Security-Framework-MobSF/releases
- 下载安装:wkhtmltopdf 该工具用于将安全测试报告转化为
pdf格式。
源码安装
Win环境安装
安装环境
- windows10
- Python3.7
- jdk1.8.0
安装步骤
- 下载好项目之后,可以重命名项目文件夹名称
MobSf,打开cmd窗口进入该项目目录。将项目内的requirements.txt打开,最后一行libsast==1.2.2改为libsast==1.3.4
- 首先安装OpenSSL,然后 执行安装文件
setup.bat
1 | C:\Users\Shuqing |
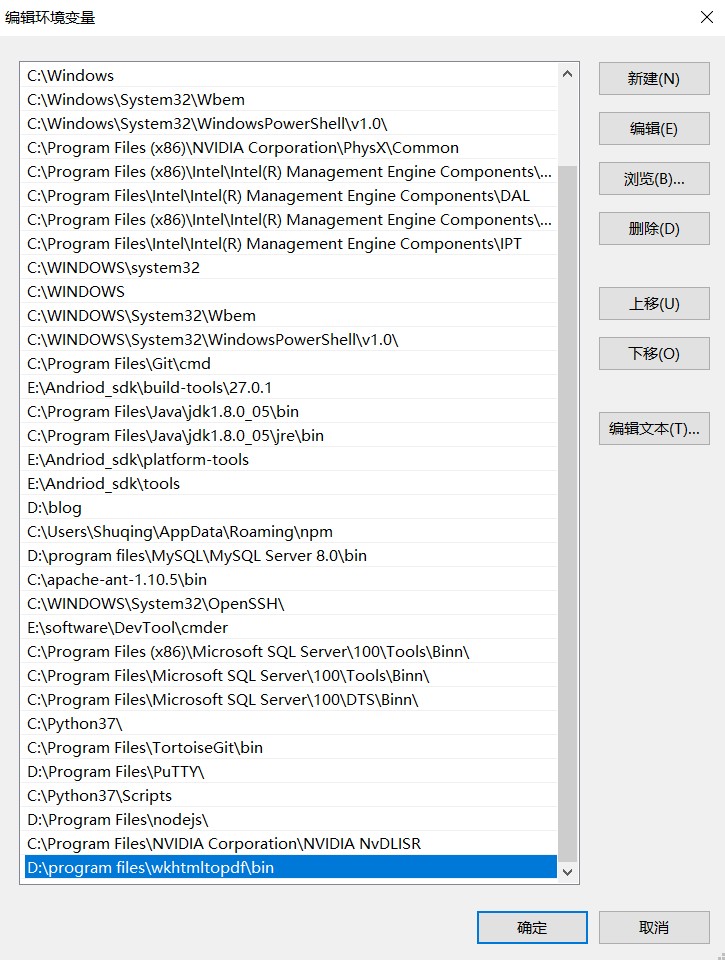
- 安装wkhtmltopdf 安装完成之后将
bin目录配置到环境变量。
- 安装好之后运行服务
1 | run.bat |
- 打开浏览器测试在地址栏中输入:
localhost:8000。如果需要修改默认端口,可以在run.bat中进行修改SET conf="0.0.0.0:8000"中的端口号。
报错处理
由于众所周知的网络原因,导致无法访问一些域名如raw.githubusercontent.com这个域名,从而运行界面会出现如下报错提示:
1 | Traceback (most recent call last): |
解决方法:
- 通过IPAddress.com首页,输入
raw.githubusercontent.com查询到真实IP地址如:199.232.4.133。 - 在本地电脑host文件中添加记录
199.232.4.133 raw.githubusercontent.com即可。
Mac环境安装
安装环境
- Mac OS 10.14
- Python 3.8
- java 12.0.2
- MobSF v3.1 beta
安装步骤
- 下载项目源码,重命名项目文件夹名称
MobSf,打开终端命令窗口进入该项目目录。输入命令./setup.sh执行安装。 - 如果安装
Python3.6以上的版本需要单独安装证书,否则后续安装过程会出现如下错误:
1 | Error: [SSL: CERTIFICATE_VERIFY_FAILED] certificate verify failed: self signed certificate in certificate chain (_ssl.c:1056) |
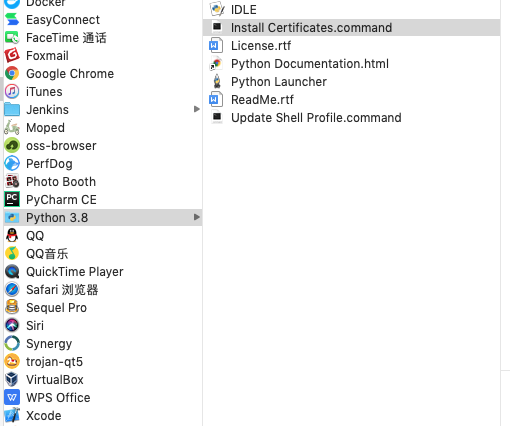
- 这是因为在
Mac操作系统下,Python不再使用系统默认的证书,且本身也不提供证书。在进行HTTPS请求时,需要使用certifi库提供的证书,但SDK不支持指定,所以只能使用Install Certificates.command命令安装证书才能解决此问题。 - 解决方法安装,手动安装
certifi然后进入到Mac的/Applications/Python{版本号}目录之中,如果是使用homebrew安装的Python则在/Applications不会有python目录,需要安装pkg安装包。
1 | pip3 install certifi |
- 安装好之后在
/Applications/Python{版本号}目录双击Install Certificates.command安装即可。
- 下载安装wkhtmltopdf
- 安装成功之后执行
sudo ./run.sh后即可运行服务。(ubuntu执行命令sudo bash run.sh) - 如果需要修改默认端口号,可以在
run.sh文件中修改PORT='8000'默认端口号。
报错处理
- 由于网络环境影响,在下载
frida文件时可能超过默认2分钟的等待时间,导致出现如下报错,可以根据报错日志提示,手动下载对应的文件放到对应的目录。
1 | Building wheel for frida (setup.py) ... error |
- 根据上面的报错提示,我们可以根据地址手动下载文件
frida-12.11.12-py3.8-macosx-10.9-x86_64.egg放置到/Users/atx/目录之中。
1 | Traceback (most recent call last): |
Docker安装
- 下载镜像
mobile-security-framework-mobsf(本文使用Mac环境下Docker安装)
1 | atxdeMac-mini:~ atx$ docker pull opensecurity/mobile-security-framework-mobsf |
使用命令
docker run -it -p 8008:8000 opensecurity/mobile-security-framework-mobsf:latest运行容器。1
2
3
4
5
6
7
8
9
10
11
12
13
14
15
16
17atxdeMac-mini:~ atx$ docker run -it -p 8008:8000 opensecurity/mobile-security-framework-mobsf:latest
[INFO] 12/Aug/2020 00:49:19 -
__ __ _ ____ _____ _____ _
| \/ | ___ | |__/ ___|| ___|_ _|___ / / |
| |\/| |/ _ \| '_ \___ \| |_ \ \ / / |_ \ | |
| | | | (_) | |_) |__) | _| \ V / ___) || |
|_| |_|\___/|_.__/____/|_| \_/ |____(_)_|
[INFO] 12/Aug/2020 00:49:19 - Mobile Security Framework v3.1.2 Beta
REST API Key: 9ded7cbd333acb8fa916783270e34cd621d690e1db910f7219f2b9fbe33b57d9
[INFO] 12/Aug/2020 00:49:19 - OS: Linux
[INFO] 12/Aug/2020 00:49:19 - Platform: Linux-4.9.184-linuxkit-x86_64-with-glibc2.29
[INFO] 12/Aug/2020 00:49:19 - Dist: ubuntu 20.04 focal
[INFO] 12/Aug/2020 00:49:19 - MobSF Basic Environment Check
[INFO] 12/Aug/2020 00:49:19 - Checking for Update.
No changes detected运行成功之后输入
电脑iP:8008即可打开首页,如下图所示:
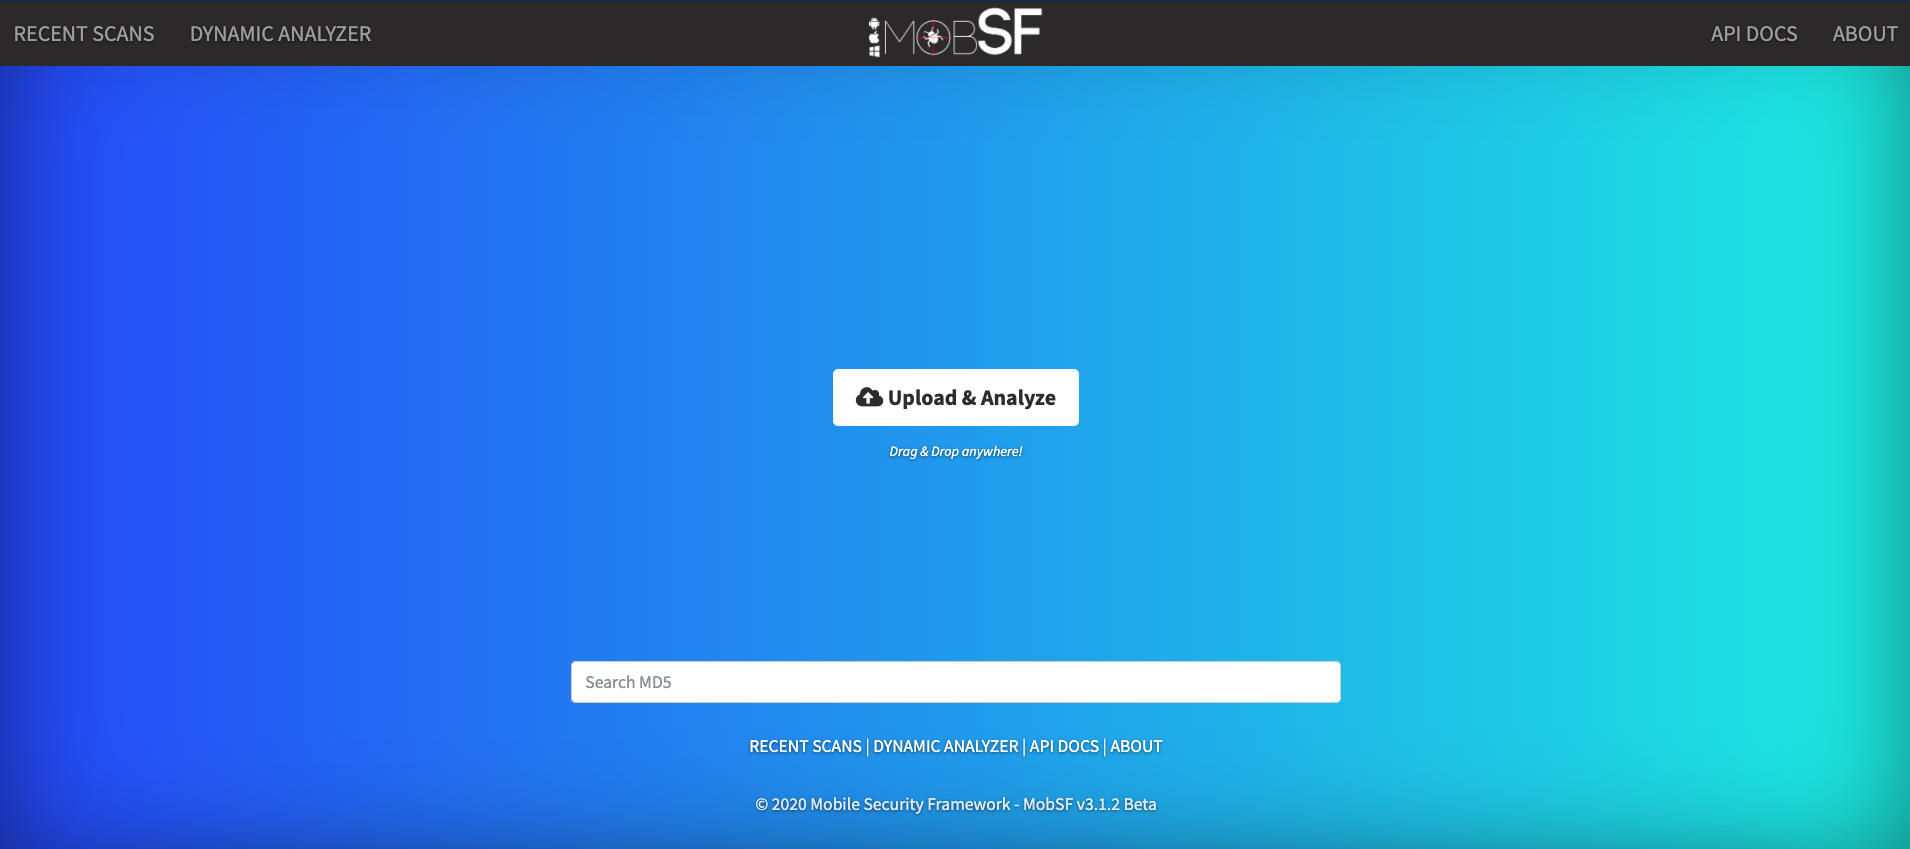
- 上传测试包可以自动开始执行扫描生成报告。
静态分析
扫描内容
Android
- APK基本信息:文件名、文件大小、
MD5、SHA-1、SHA-256 - APP信息:包名、
Main Activity、版本号等 - 组件:
Activity、Service、Broadcast Receiver、Content Provider - 证书信息(
Signer Certificate) - 权限信息
Android API信息Androidmanifest分析(标志位、组件配置等)- 代码分析、文件分析
url、email、string等
iOS
IPA基本信息- 自定义网址方案
- 权限许可
- 应用传输安全性(
ATS) Plist文件分析- 文件分析
- 请求网站分析
- 防火墙数据库
- 邮件,源文件
报告查看
上传Android 或iOS(需要部署到Mac OS环境下) 测试包自动执行扫描,扫描报告结果如下:

报告汉化
该平台没有提供多语言版本,所以想要中文显示界面需要需要自己汉化,主要是汉化项目中templates中的前端页面文件。
报告对比
在Recent Scans界面选择一个应用点击Diff or Compare,再选择另外一个应用即可自动对比。

动态分析
功能简介
MobSF支持Android应用动态分析(iOS 应用不支持),可以动态调试正在运行的应用。
环境要求
如果需要动态分析,请不要在Docker或虚拟机中部署MobSF,另外需要下载安装Genymotion模拟器。
设备系统版本
在启动MobSF之前,请运行Genymotion模拟器 。一切都会在运行时自动配置。建议使用Android 7.0及更高版本。
Android 5.0-9.0-这些版本使用Frida(一款基于python + java的hook框架),开箱即用。Android 4.1-4.4- 这些版本使用Xposed Framework。
HTTPS代理
- 对于
Android的版本4.4 - 9.0,全局代理设置在运行时自动应用。 - 对于
Android版本4.1-4.3,需要设置Dynamic Analyzer页面中显示的Android VM代理。
ARM转换
Genymotion是基于X86的,不支持ARM架构。所以有些应用是基于ARM架构编译的就无法安装,出现如下提示
1 | [INFO] 22/Sep/2020 08:51:01 - Getting screen resolution |
解决方案
下载安装转换工具Genymotion_ARM_Translation 根据自己的模拟器系统版本下载对应的zip包,然后将包直接拖入到模拟器安装,安装完成后重启模拟器即可。
搭建步骤
- 启动
Genymotion模拟器。 - 在主界面点击左上角菜单
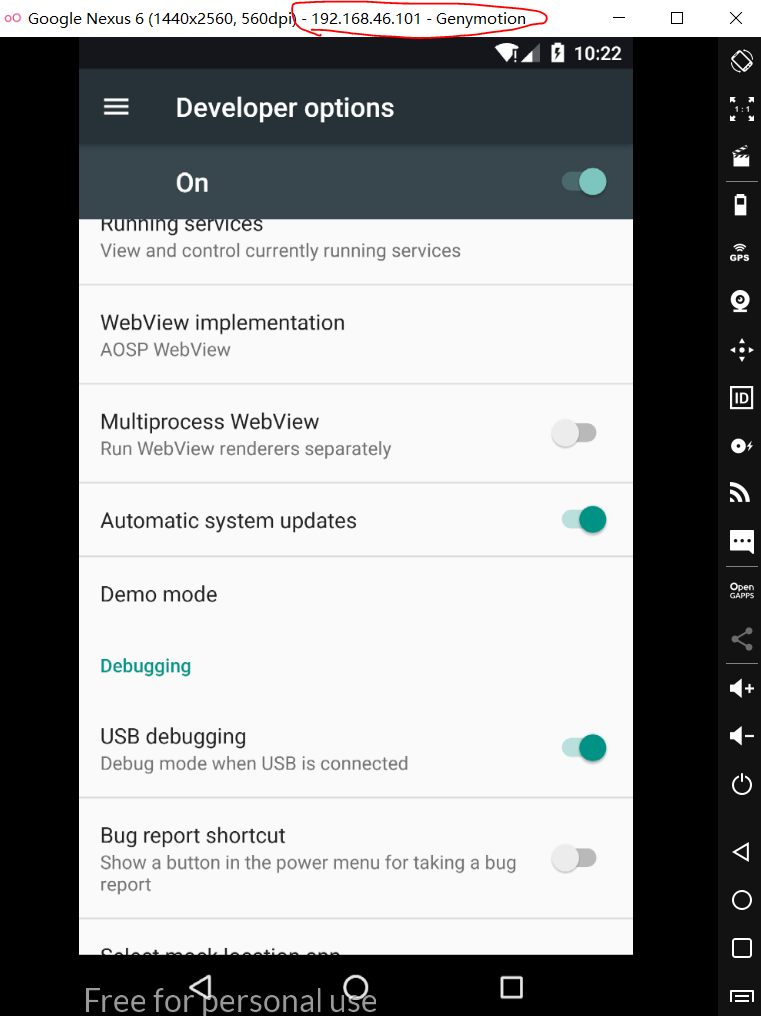
DYNAMIC ANALYZER - 进入动态分析引导页面后,可以右侧看到设备的地址
192.168.46.101:5555。
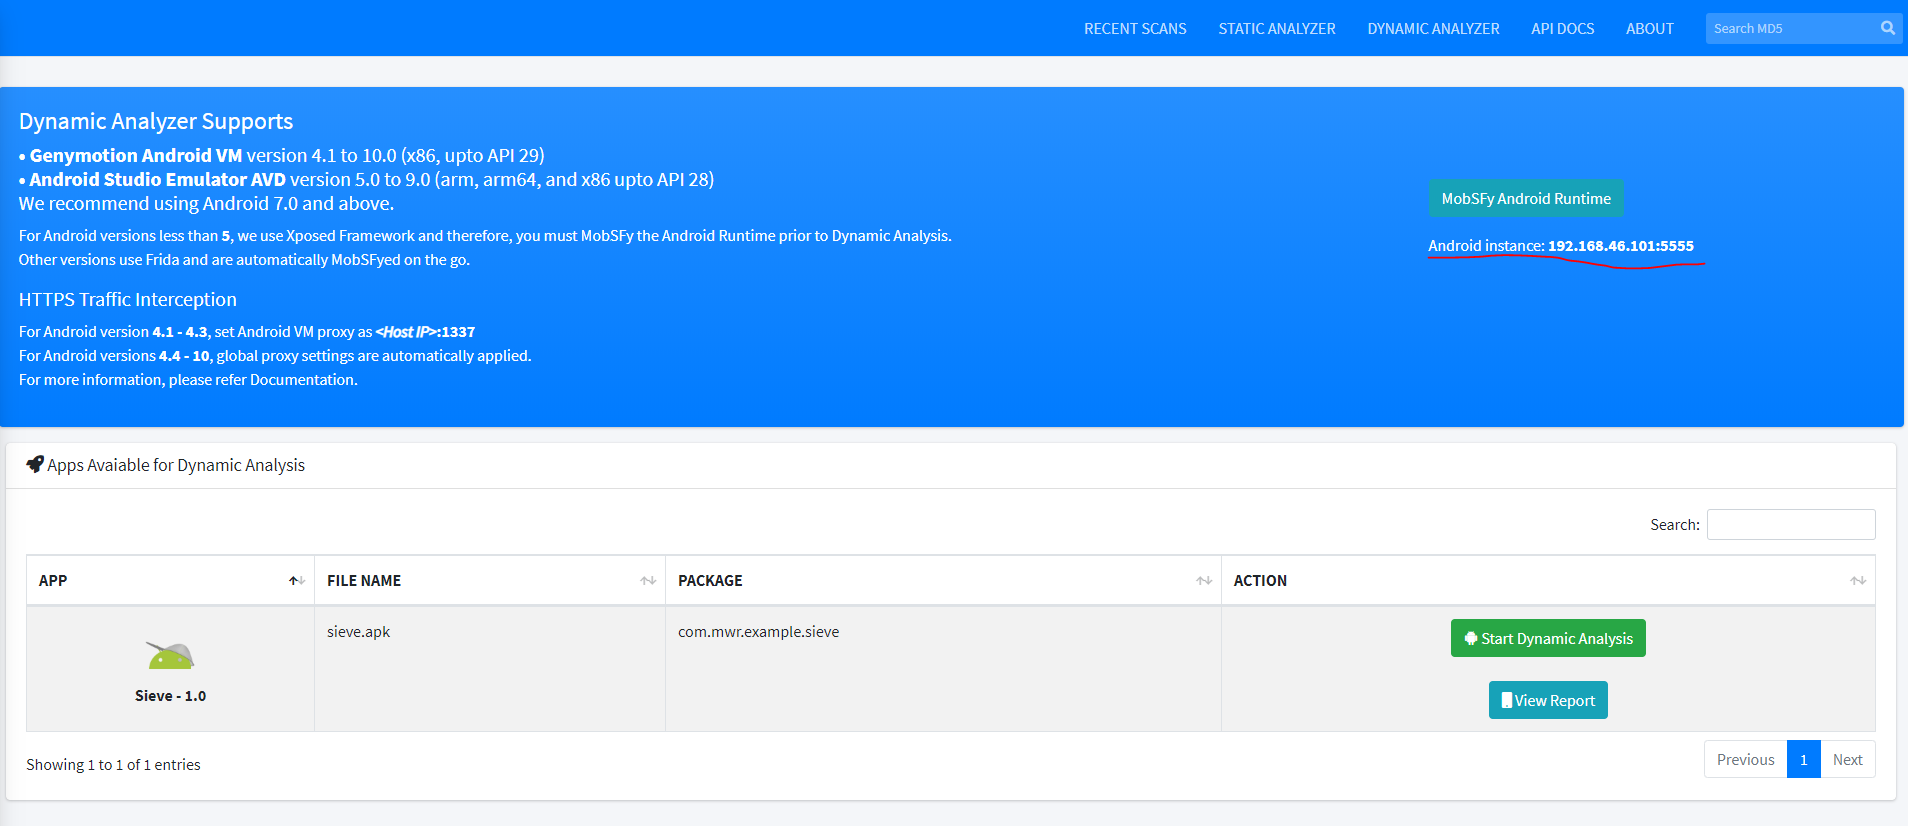
- 这个地址和模拟器界面顶部标题显示的地址是一致的。
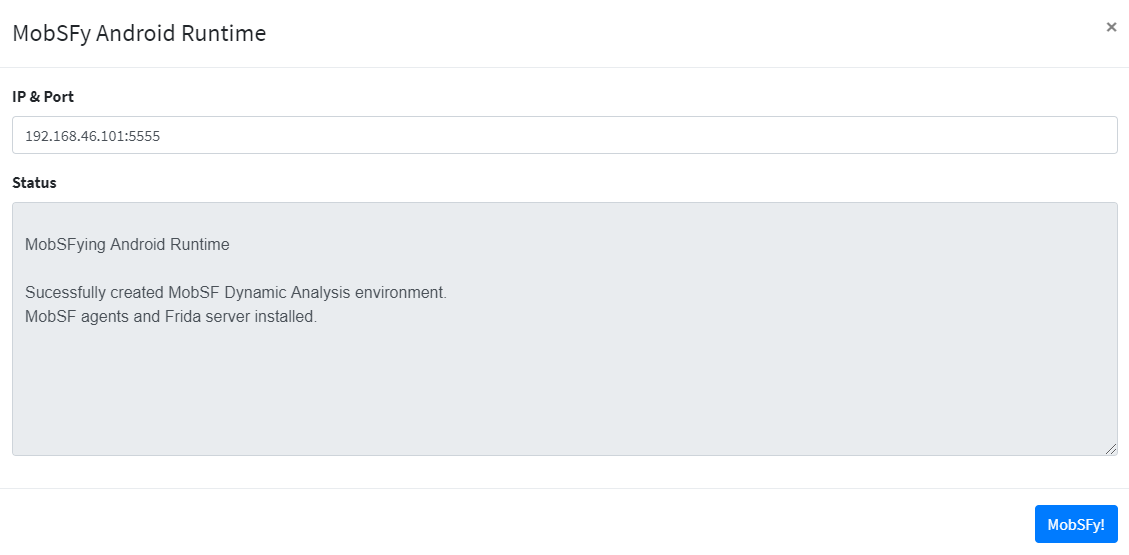
- 回到动态分析引导页面,点击
MobSFy Android Runtime,然后点击弹窗界面的MobSFy!按钮检测动态分析环境是否正常。界面提示MobSF agents and Frida server installed.说明环境正常。
- 如果
Android instance无法检测到设备,可以在项目文件中MobSF/setting.py中添加配置ANALYZER_IDENTIFIER = '192.168.56.101(模拟器实际ip):5555'然后重启MobSF服务。
动态分析执行
引导页面在历史静态扫描记录上点击【Start Dynamic Analysis】 按钮进入动态分析界面,运行成功之后可以进入动态分析页面如下图所示: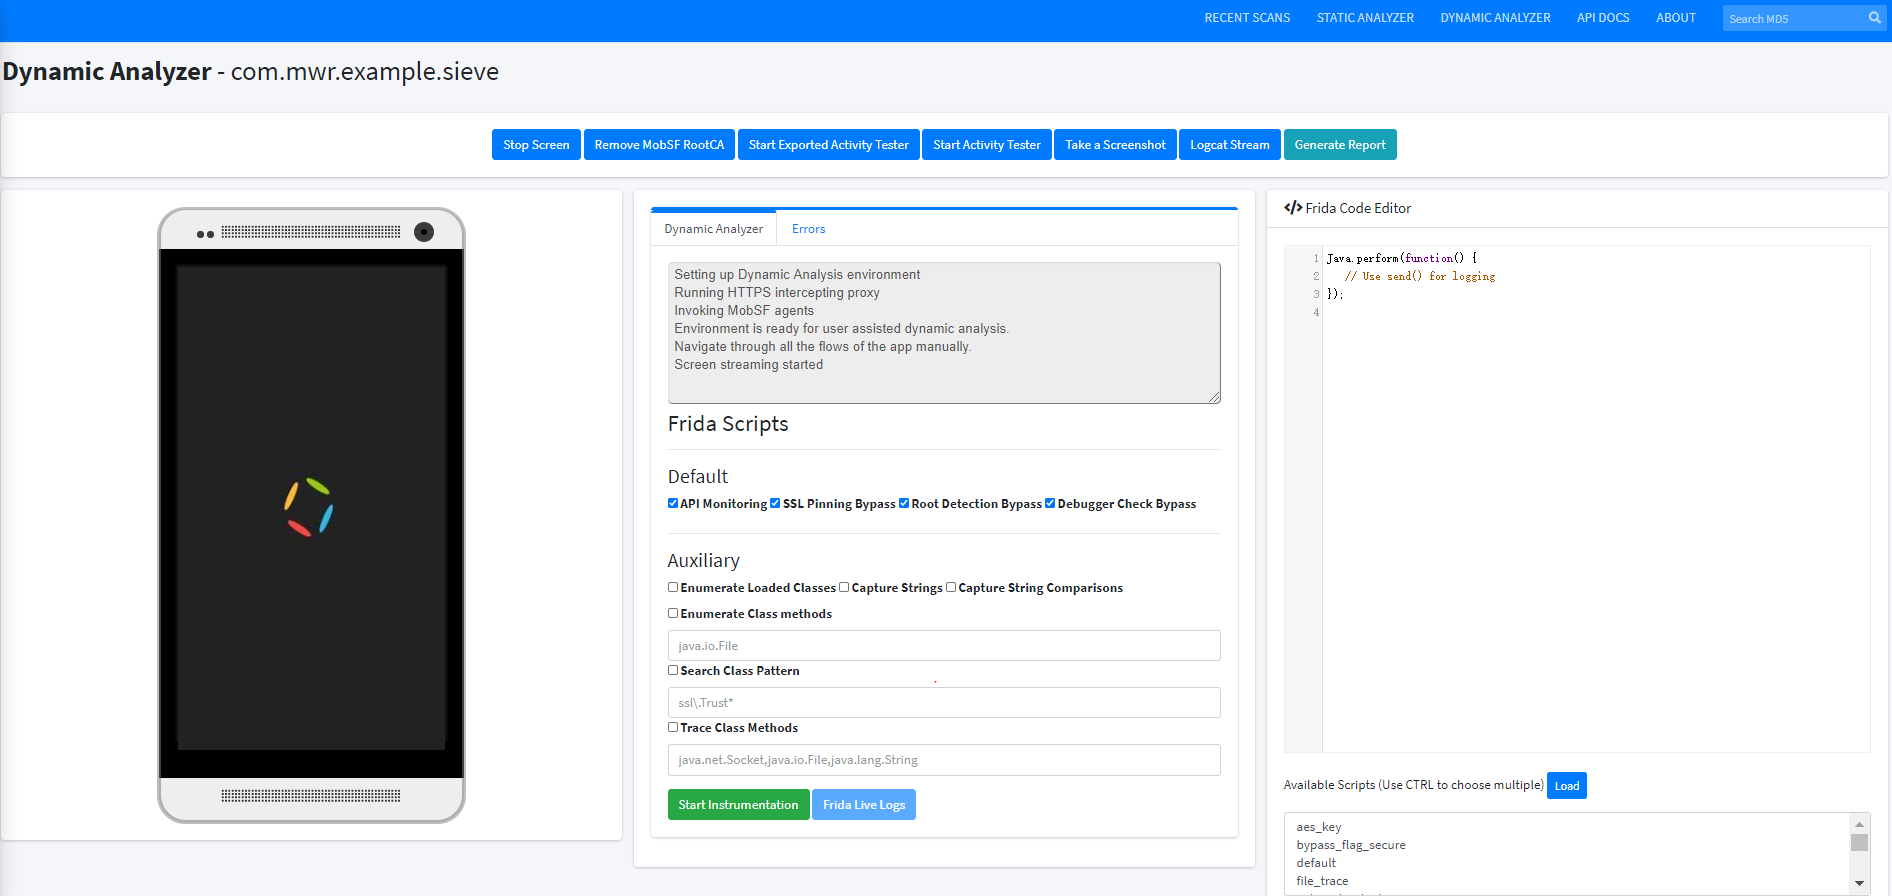
- 观察
run运行命令界面可以看到日志信息1
2
3
4
5
6
7
8
9
10
11
12
13
14
15
16
17
18
19
20
21
22
23
24
25
26[INFO] 22/Sep/2020 10:43:17 - Creating Dynamic Analysis Environment
[INFO] 22/Sep/2020 10:43:20 - ADB Restarted
[INFO] 22/Sep/2020 10:43:20 - Waiting for 2 seconds...
[INFO] 22/Sep/2020 10:43:22 - Connecting to Android 192.168.46.101:5555
[INFO] 22/Sep/2020 10:43:22 - Waiting for 2 seconds...
[INFO] 22/Sep/2020 10:43:24 - Restarting ADB Daemon as root
[INFO] 22/Sep/2020 10:43:24 - Waiting for 2 seconds...
[INFO] 22/Sep/2020 10:43:26 - Reconnecting to Android Device
[INFO] 22/Sep/2020 10:43:27 - Waiting for 2 seconds...
[INFO] 22/Sep/2020 10:43:30 - Found Genymotion x86 Android VM
[INFO] 22/Sep/2020 10:43:30 - Remounting
[INFO] 22/Sep/2020 10:43:30 - Performing System check
[INFO] 22/Sep/2020 10:43:30 - Android API Level identified as 24
[INFO] 22/Sep/2020 10:43:30 - Android Version identified as 7.0
[INFO] 22/Sep/2020 10:43:30 - Environment MobSFyed Check
[INFO] 22/Sep/2020 10:43:30 - Installing MobSF RootCA
[INFO] 22/Sep/2020 10:43:31 - Starting HTTPs Proxy on 1337
[INFO] 22/Sep/2020 10:43:31 - Killing httptools UI
[INFO] 22/Sep/2020 10:43:31 - Enabling ADB Reverse TCP on 1337
[INFO] 22/Sep/2020 10:43:31 - Setting Global Proxy for Android VM
[INFO] 22/Sep/2020 10:43:32 - Starting Clipboard Monitor
[INFO] 22/Sep/2020 10:43:33 - Getting screen resolution
[INFO] 22/Sep/2020 10:43:33 - Removing existing installation
[INFO] 22/Sep/2020 10:43:34 - Installing APK
[INFO] 22/Sep/2020 10:43:35 - Testing Environment is Ready!
动态分析功能主要如下:
| 功能菜单 | 说明 |
|---|---|
| Show/Stop Screen | 开启/关闭屏幕 |
| Install/Remove MobSF RootCA | 安装卸载MobSF证书 |
| Start Exported Activity Tester | 测试导出类型的Activity |
| Start Activity Tester | 测试Activity |
| Take a Screenshot | 截屏 |
| Logcat Stream | 日志流信息 |
| Generate Report | 生成报告 |
Show/Stop Screen
1.点击Show Screen 可以实时同步设备屏幕,方便测试执行查看。在Dynamic Analyzer菜单可以查看实时动态分析日志,Errors菜单可以查看错误日志。

Frida Scripts 栏设置是设置
Frida相关选项,Frida是个轻量级别的hook框架,核心是用C编写的,并将Google的V8引擎注入到目标进程中,在这些进程中,JS可以完全访问内存,Hook函数甚至调用进程内的本机函数来执行。一般使用默认的配置选项即可,如果想进阶测试,可以勾选
Auxiliary中的选项,甚至右侧Frida Code Editor编辑窗口,可以直接编写脚本进行调试。Fira使用教程请参考官方文档:https://frida.re/docs/home/
Install/Remove MobSF RootCA
Install/Remove MobSF RootCA用来安装卸载MobSF CA证书,方便对样本中HTTPS流量进行截获。
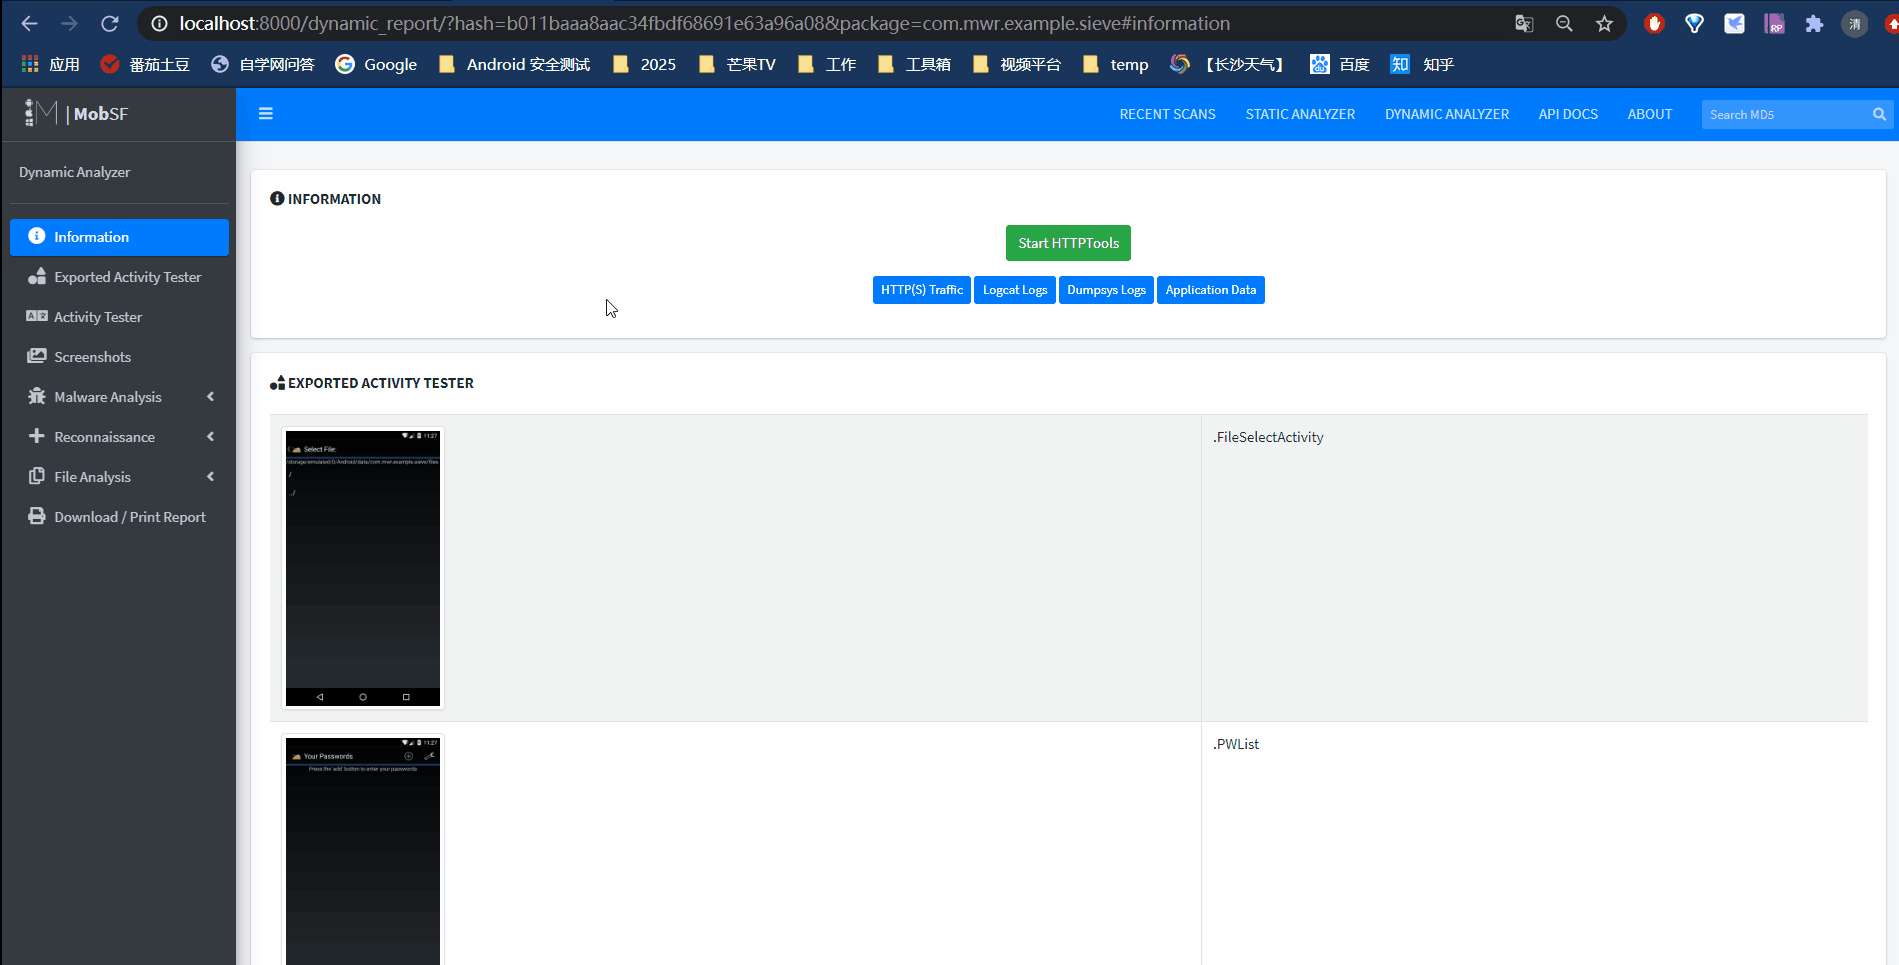
Start Exported Activity Tester
遍历获取AndroidManifest.xml文件中的所有Exported Activity 测试流程如下:
- 依次启动
activity,adb -s IP:PORT shell am start -n PACKAGE/ACTIVITY - 获取当前
activity运行时的屏幕截图,并保存截屏 - 强制关闭应用:
adb -s IP:PORT shell am force-stop PACKAGE
Start Activity Tester
- 遍历
AndroidManifest.xml文件中的所有Activity,而不单单是Exported。 - 处理流程与
Exported Activity一致。
Take a Screenshot
截屏并保存到本地。
Logcat Stream
输出logcat日志信息,如下所示:
1 | 09-21 22:15:31.252 573 573 D ConditionProviders.SCP: onReceive android.intent.action.TIME_SET |
Generate Report
生成动态分析报告,如下图所示:
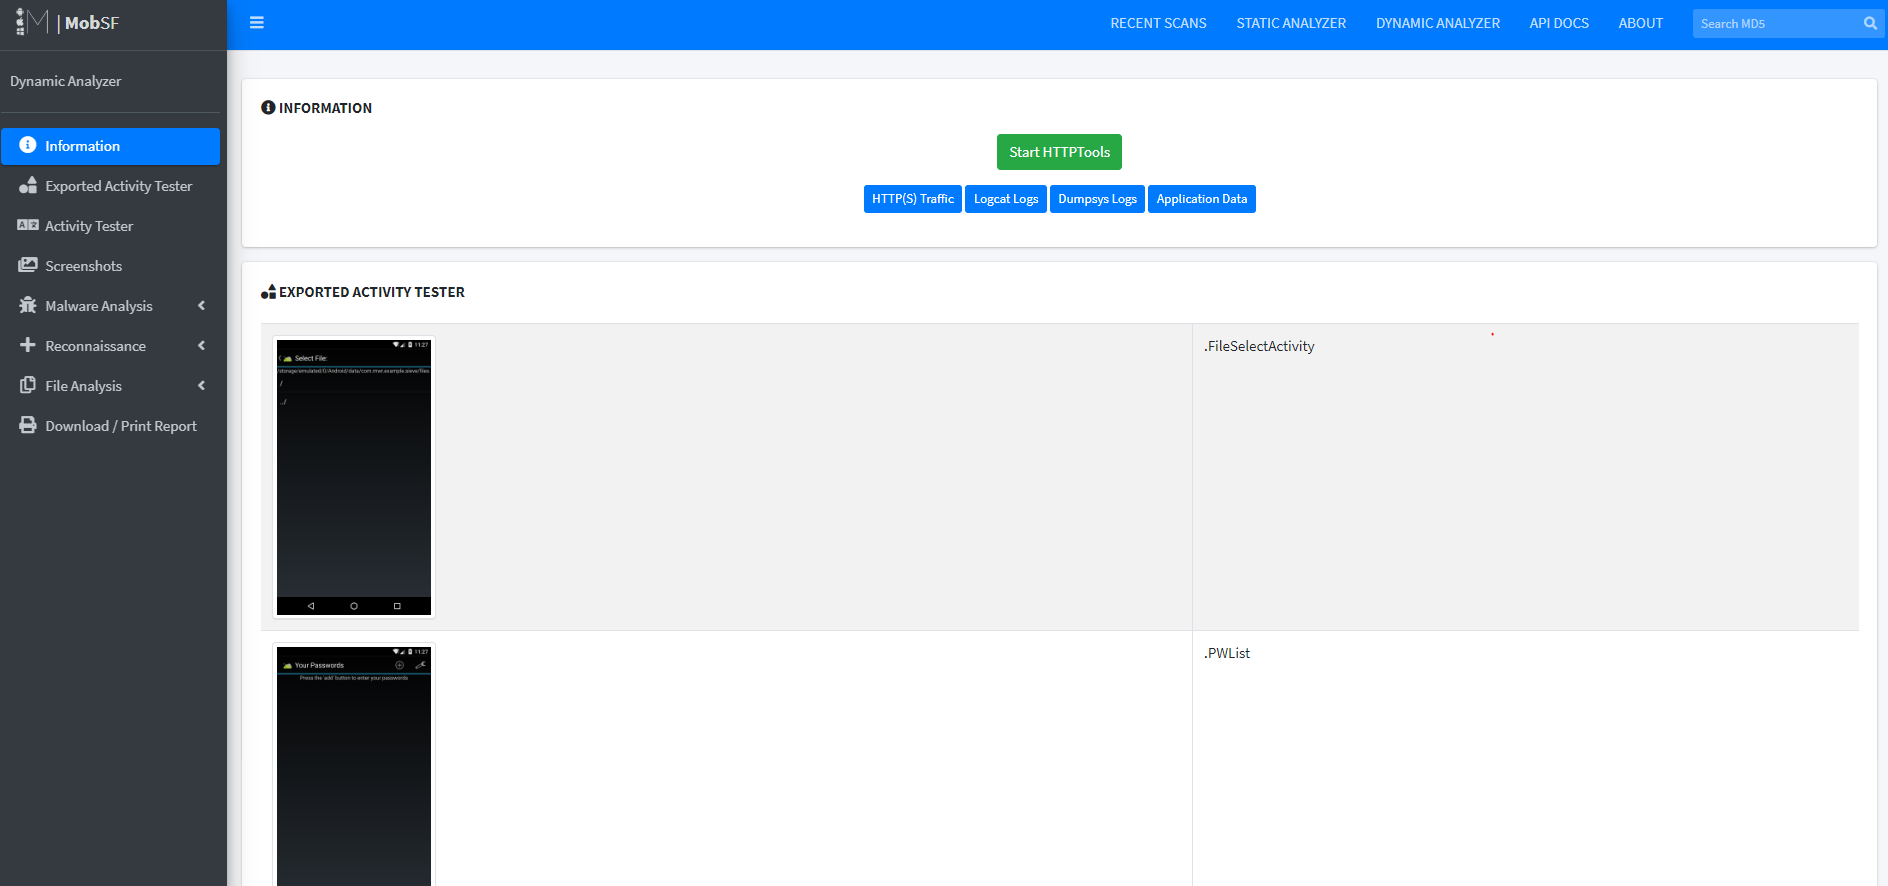
可以点击左侧菜单查看动态测试项目的报告详情
参考资料
- https://www.jianshu.com/p/4ba4312985ee
- https://www.leadroyal.cn/?p=326
- https://blog.csdn.net/u013107656/article/details/53908041?utm_source=blogxgwz3
- https://blog.csdn.net/xzy565143480/article/details/103194085
- https://www.ioiox.com/archives/62.html
- https://www.jianshu.com/p/7c9570cbb609
- https://mobsf.github.io/docs/#/dynamic_analyzer?id=genymotion-android-x86_64
- https://blog.csdn.net/u013107656/article/details/53995545
- https://blog.csdn.net/hellomanshan/article/details/78229613